
Hello friends! Has it really been a whole month since I last shared an update? I’ve missed this place.
Let’s see, in April, I traveled home to Costa Rica to visit my family, so I disconnected for a bit. We also had prom, a birthday and Mothers’ Day. It always takes me a while to readjust after I get back from vacation, so blogging dropped to the bottom of my list.
I was thinking of sharing some more details about our trip in a separate post. People often ask me for recommendations of places to see and things to do in Costa Rica and I never feel like I can give them a good answer. This time, I tried to take some notes, so check back for that content!
Since I got back, I’ve been focusing on doing a little bit of spring cleaning and trying to get outside more. I also gifted myself a monthly swimming pass, so I’ve been at the pool a lot.

I love swimming. I love being under the water, disconnecting from everything, focusing on breathing and improving my form, and these days I’m working really hard to improve my breaststroke technique, which I’m truly awful at!
When I was in college, my older sister and I loved going to the university’s swimming pool to swim laps. It was a great way to get some exercise and an easy way to get a tan (very important for our younger selves! 🤭) One of the swimming coaches was always at the pool when we swam. Every now and then, he would give us pointers on how to improve our technique, but when it came to breaststroke, I think he thought I was hopeless. He made me do lots of kicking drills, but I just couldn’t get the motion right.
I still don’t quite know how to do it. So, I’m practicing. I’m watching videos on Youtube. I practice kicking in the water and standing up in my living room. I know it probably sounds crazy, but I can get a bit obsessive about things. But the only thing that matters is that I’m having fun, right? Who knows, I might finally crack the breaststroke code!
Okay, enough chit-chat. I want to show you my F.O.s (finished objects for those not familiar with this term.) Both are crochet projects, which is different for me.
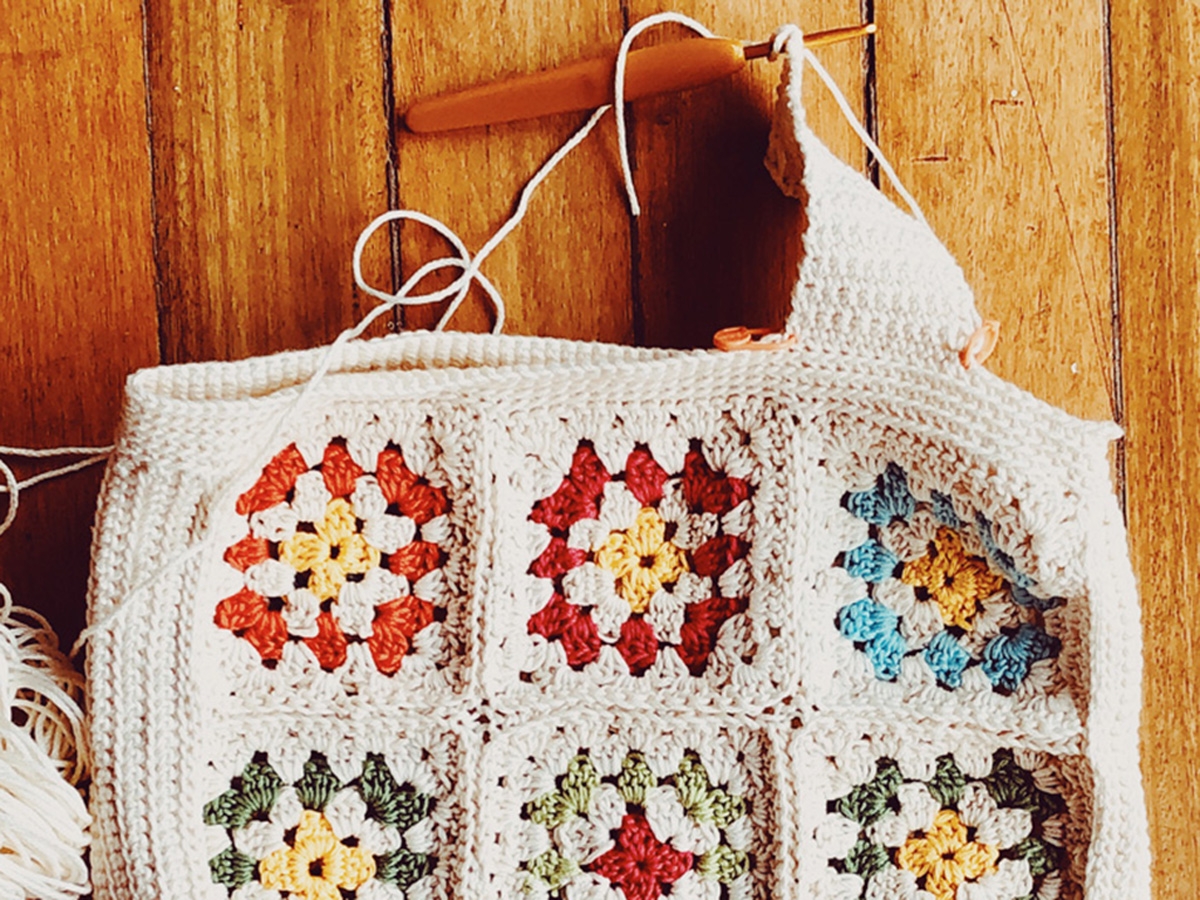
Granny Squares Tote
I started making granny squares about three years ago, when I planned to crochet a small cosmetics pouch. As I made more and more squares, I started dreaming about making a blanket for our bed, which is a hilarious thought.
My great grandmother, Pepén, used to crochet bedspreads and tablecloths all the time, so for a moment I thought, maybe I could do that. Except, I remembered that perhaps the fact that she could do that was that she didn’t have a job! it would take me about a century to finish a bedspread. So, I decided to keep my goals a bit more realistic and make a small handbag instead.

I had already crocheted enough squares to make a bag. All I had to do was figure out how I wanted to arrange them. When I found a combination I liked, I took a picture so I would remember which one went where. After that, I connected them with a simple slip stitch.
To give the bag some depth, I picked up stitches around three of the edges of the big square and worked back and forth in single crochet until I reached the width I liked. I then joined the second rectangle and crocheted around the top edge, also in single crochet. To finish, I added some handles to each side.
I like the result! All the granny squares I used (but one) had the same color (yellow) in the center. I worried about that at first, but it ended up making my bag a bit different from most granny square bags I’d seen.
When I finished, I decided to line the bag with white fabric. I used leftovers from the days of making masks. I thought it would look nicer and it would also make the bag more practical. I followed Vicky Howell’s instructions for adding a lining to a bag on YouTube and even added one of my Fairfax Hill Studio labels. (So proud!)

Japanese Knot Bag (Mosu Bag)
The second project I finished last weekend is a Japanese knot bag. This is a free pattern by @sweetsofties that you can find on YouTube. My mom sent me the link about a week ago and I decided to drop all of my other projects to make it. This type of bag had been on my wish list for a while.

It took me only about one day to crochet the bag. It still needs a lining, which should be easy to add, now that I’ve learned how to do it.


To make it, I used one ball of Lily Sugar‘n Cream cotton yarn in the color Bamboo with the recommended hook and followed along with the girl in the video. After I completed the base of the bag, I was able to take the project with me to the beach to finish the body. I returned to the video to see how to attach the handles, and that was it! Super easy.
My bag is about 10 inches square, and the handles are about 3 inches wide, one longer than the other so that you can “knot” it.
If you know how to crochet an oval, you can make this bag in any size and stitch combination you like. You can also change the base to a circle for the bag to stand up easily.
I love this bag’s design for carrying small projects. It will also be perfect for carrying my goggles, cap and I.D. next time I go for a swim. It’s the perfect size.
Hook Matters
While working on the Mosu bag, I learned that the kind of crochet hook you use can make a big difference in what your final project looks like. I started my bag using a standard aluminum “H” hook, which at times made pulling the yarn through the loops a bit difficult. It seemed as though the head of the hook was a little too big, so it was getting stuck. This slowed me down and was resulting in some larger gaps in a few spots.
Then, after I misplaced that hook, I grabbed a different one I had recently bought at Dharma. My goodness! What a difference! Everything was smoother and easier. The newer hook also had a soft handle, which felt great in my hand. The brand is Clover Amour. They are a little more expensive than your standard aluminum set, but definitely worth it.
I’m putting these on my Christmas wish list!

